This post goes into the details of how to set up a Home Assistant instance behind a Google Authentication proxy that allows pre-defined @gmail.com to access your Home Assistant instance, while also allowing Google Assistant integration in Home Assistant to work correctly.
This setup relies setting up a Wiregate instance that will act as a authentication proxy in the Cloud which will sit in front of your Home Assistant. For details on how to set it up, see previous post
Set up Home Assistant using Docker
If you already have a running Home Assistant instance, feel free to skip this section. However if you don’t, it describes how to set it up using Docker on an Ubuntu instance in a semi-sensible way.
mkdir -p /etc/homeassistant
echo "TZ=Europe/London" > /etc/homeassistant/homeassistant.env
Note, set up your timezone to match. We’ll be mixing up a little bit the Home Assistant instructions, with a custom systemctl file that pins a particular Docker tag (so you don’t get surprise updates).
Just add this file /etc/systemd/system/homeassistant.service:
[Unit]
Description=Home Assistant Service
After=docker.service network-online.target

[Service]
Restart=always
EnvironmentFile=/etc/homeassistant/homeassistant.env
ExecStart=/usr/bin/docker run \
    --name="homeassistant" \
    --init \
    --attach stderr --attach stdout \
    --volume /etc/homeassistant:/conf \
    --env-file=/etc/homeassistant/homeassistant.env  \
    --rm \
    --net=host \
        homeassistant/home-assistant:0.109.0b2
Restart=always
ExecStop=/usr/bin/docker stop -t 2 homeassistant

[Install]
WantedBy=multi-user.target
And then install Docker and enable it.
sudo apt-get install docker.io
sudo systemctl daemon-reload
sudo systemctl start docker
sudo systemctl start homeassistant
This should start up a homeassistant instance on http://<yourhost>:8123. Go there first, and create a user account, and complete the onboarding.
Authentication set up
Home Assistant comes with a fairly rich user management system, but unfortunately it’s all password-based. The setup we’ll follow is a simplified version of what has been previously tried on Reddit. However, as Home Assistant developers are reluctant (see issue) to merge in a authentication proxy-based authentication method, we will fall back to a configuration that works in standard Home Assistant. In short: all Google-authenticated users will utilize the same Home Assistant account.
First of all, let’s configure the Legacy API password. This will create a Legacy API user, as well as allow you to access Home Assistant over your local network by using a password.
In the newly created files in /etc/homeassistant edit configuration.yaml and add:
homeassistant:
  auth_providers:
   - type: legacy_api_password
     api_password: !secret http_password
Add your password into your secrets.yaml (see docs)
Now, we’ll make Home Assistant trust all HTTP requests originating from the Wiregate’s proxy server’s VPN IP 10.212.0.1 (see previous post), and make it authenticate as the Legacy API user. To find the Legaci API user identifier, follow the documentation.
Your configuration.yaml section should look as follows:
homeassistant:
  auth_providers:
   - type: trusted_networks
     trusted_networks:
       - 10.212.0.0/24
     trusted_users:
       10.212.0.1: 7855df59fa5448be92a4b7a777a2d658 #legacy password user
     allow_bypass_login: true
   - type: legacy_api_password
     api_password: !secret http_password
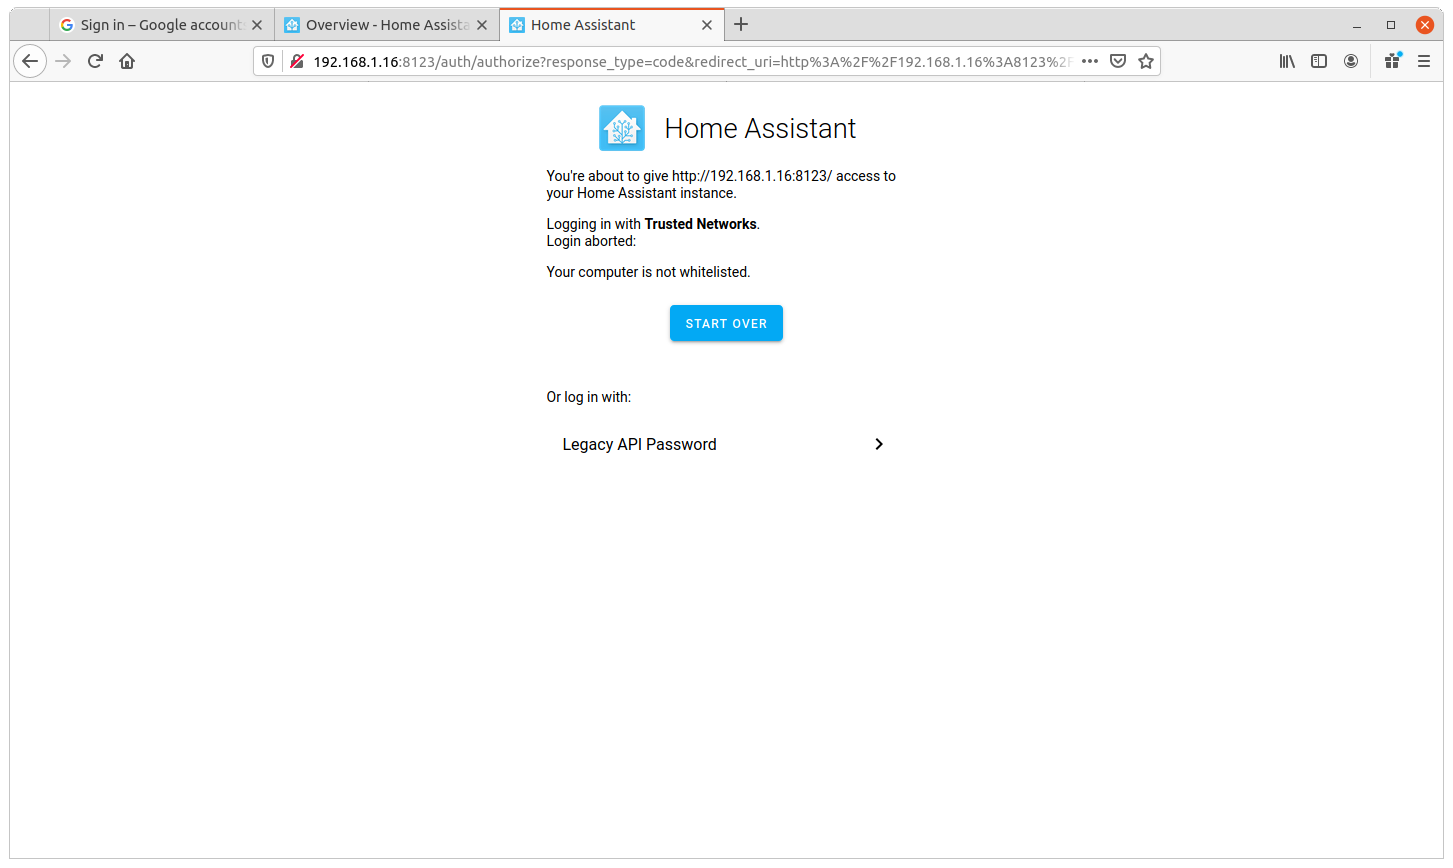
The login page when visited over the local network.
Configure Wiregate’s Traefik for Home Assistant
We will extend the configuration from the previous post. We’ll make all of Home Assistant be available under home.example.com behind the Google Authentication middleware, except for API endpoints for auth and Google Assistant.
This is what a complete traefik.dynamic.toml file would look like:
[http.routers]
  [http.routers.simple]
    rule = "Host(`wiregate.example.com`)"
    service = "api@internal"
    middlewares = ["google-forward-auth"]
    [http.routers.simple.tls]
      certresolver = "wildcardtls"
      [[http.routers.simple.tls.domains]]
        main = "example.com"
        sans = ["*.example.com"]

  [http.routers.auth]
    rule = "Host(`auth.example.com`)"
    service = "forward-auth"
    middlewares = ["google-forward-auth"]
    [http.routers.auth.tls]
      certresolver = "wildcardtls"
      [[http.routers.auth.tls.domains]]
        main = "example.com"
        sans = ["*.example.com"]

  [http.routers.home]
    priority = 1
    rule = "Host(`home.example.com`)"
    service = "homeassistant"
    middlewares = ["google-forward-auth"]
    [http.routers.home.tls]
      certresolver = "wildcardtls"
      [[http.routers.home.tls.domains]]
        main = "example.com"
        sans = ["*.example.com"]

  [http.routers.home-noauth]
    priority = 2
    rule = "Host(`home.example.com`) && (PathPrefix(`/api/google_assistant`) || PathPrefix(`/auth`))"
    service = "homeassistant"
    [http.routers.home-noauth.tls]
      certresolver = "wildcardtls"
      [[http.routers.home-noauth.tls.domains]]
        main = "example.com"
        sans = ["*.example.com"]

[http.middlewares]
  [http.middlewares.google-forward-auth.forwardAuth]
    address = "http://127.0.0.1:4181/"
    trustForwardHeader = true
    authResponseHeaders = ["X-Forwarded-User"]

[http.services]
  # Traefik Forward Auth server running locally.
  [http.services.forward-auth.loadBalancer]
    [[http.services.forward-auth.loadBalancer.servers]]
      url = "http://127.0.0.1:4181/"

  # Home Assistant
  [http.services.homeassistant.loadBalancer]
    [[http.services.homeassistant.loadBalancer.servers]]
      url = "http://rapsberrypi.vpn.local:8123/"
Note the difference between home-noauth and home routes. The home-noauth takes priority over the authenticated one, allowing Google Assistant services to redirect/call back to the Google Assistant API and Home Assistant without being subject to the google-forward-auth middleware.
uration.yaml` above).
The following curl commands should test whether the configuration is correct: expect a 307 redirect for authenticated URLs and other responses for direct access ones.
Normal landing page should redirect you to Google Auth:
$ curl  -sD - -o /dev/null  https://home.example.com/
HTTP/2 307
location: https://accounts.google.com/o/oauth2/<truncated>
Auth endpoints should return bad method and suggest to use other ones:
$ curl  -sD - -o /dev/null  https://home.example.com/auth/token
HTTP/2 405
allow: OPTIONS,POST
Any other API other than Google should expect an authenticated call
$ curl  -sD - -o /dev/null  https://home.example.com/api/some_other
HTTP/2 307
location: https://accounts.google.com/o/oauth2/<truncated>
The Google Assistant API should return bad method, expecting other ones:
$ curl  -sD - -o /dev/null  https://home.example.com/api/google_assistant
HTTP/2 405
allow: OPTIONS,POST
Adding a dummy light
If you previously configured Home Assistant, and have existing devices (e.g. lights), you can skip this part. However, to keep things simple, we’ll only publish a dummy light to Google Assistant.
In order to check whether our integration works, we will add a dummy light entity, using the light template into the configuration.yaml:
light:
  platform: template
  lights:
    dummy_light:
      friendly_name: "Dummy Light"
      turn_on:
        # empty mendatory field
      turn_off:
        # empty mendatory field
      set_level:
        # empty mendatory field
Now, restart Home Assistant, and add the Dummy light to one of your Dashboards to make it’s on/off state visible.
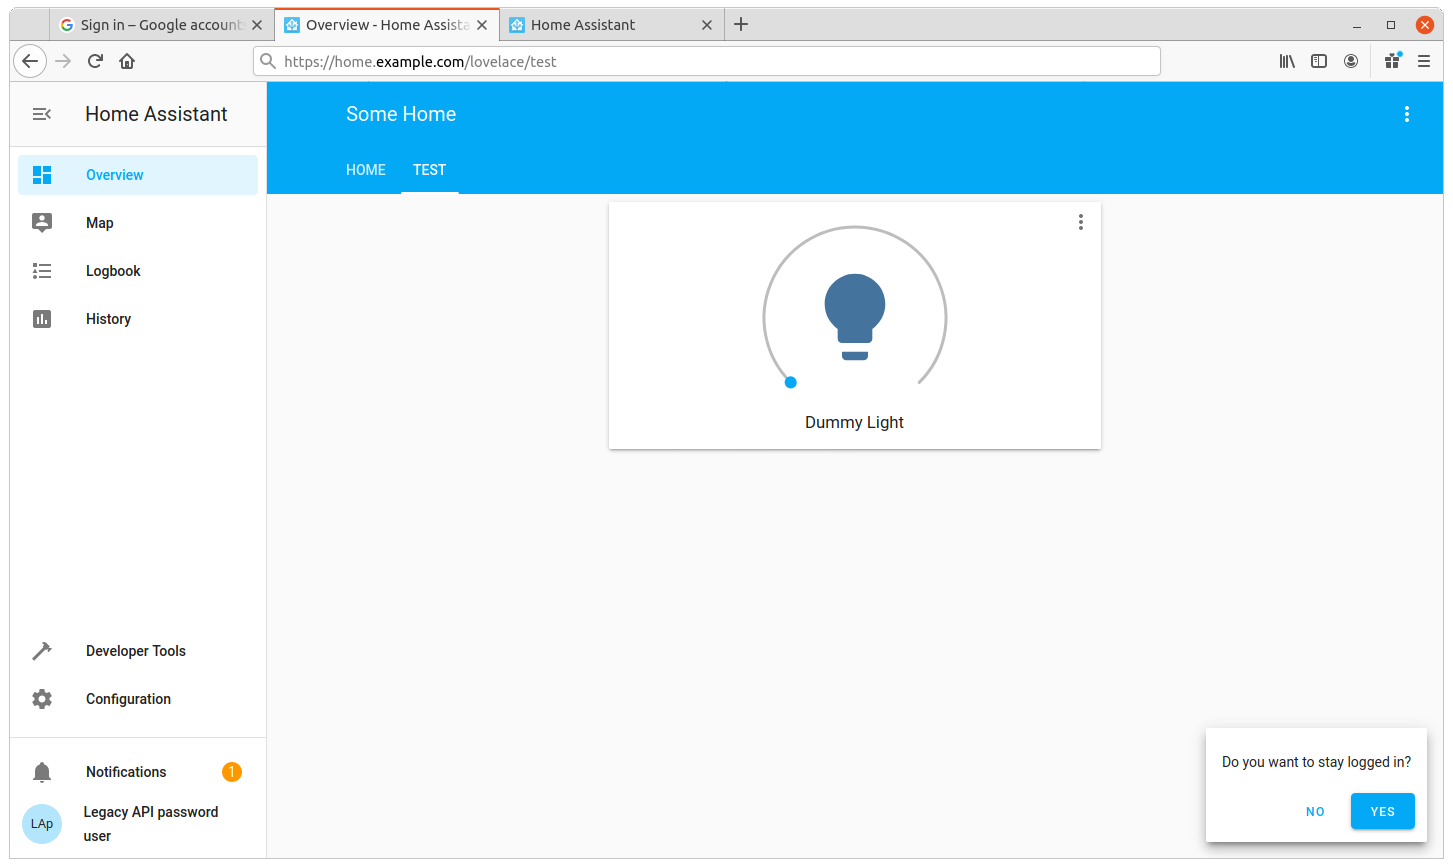
The Dummy Light visible on a separate dashboard.
Adding a Google Assistant Action
Google Assistant allows third parties to create Actions. Actions are usually published by third-party providers (e.g. Philips Hue) for consumption by multiple users. That’s also how Home Assistant’s paid integration work. However, individual users can create test Actions and make them available in their individual homes without the need to publish.
I highly recommend settig up a separate Google Cloud Project for these actions, as it will allow you to fine-grain the access to your test action. In the reminder of this writeup, your Project Name is substituted with <myproject>
Service account creation
First, we’ll need a Service Account. While this is not strictly necessary, it allows you to tell “OK Google, Sync my devices” to update the list of devices managed via GA on Home Assistant. It is super handy for testing.
To do this, follow the instructions at GA’s Report state.
This service account will be created within your GCE project. Make sure to grant it a role of Service Accounts > Service Account Token Creator so it can generate tokens to access Google APIs. Name it
homeassistant@<myproject>.iam.gserviceaccount.com.. Create a JSON key for it and keep that safe (you can always regenerate another one).
Double-check that the Service Account is available under HomeGraph API credentials.
Google Action creation
Follow the instructions in Google Assistant integration to set it up.
A completed Actions tab should look like this.
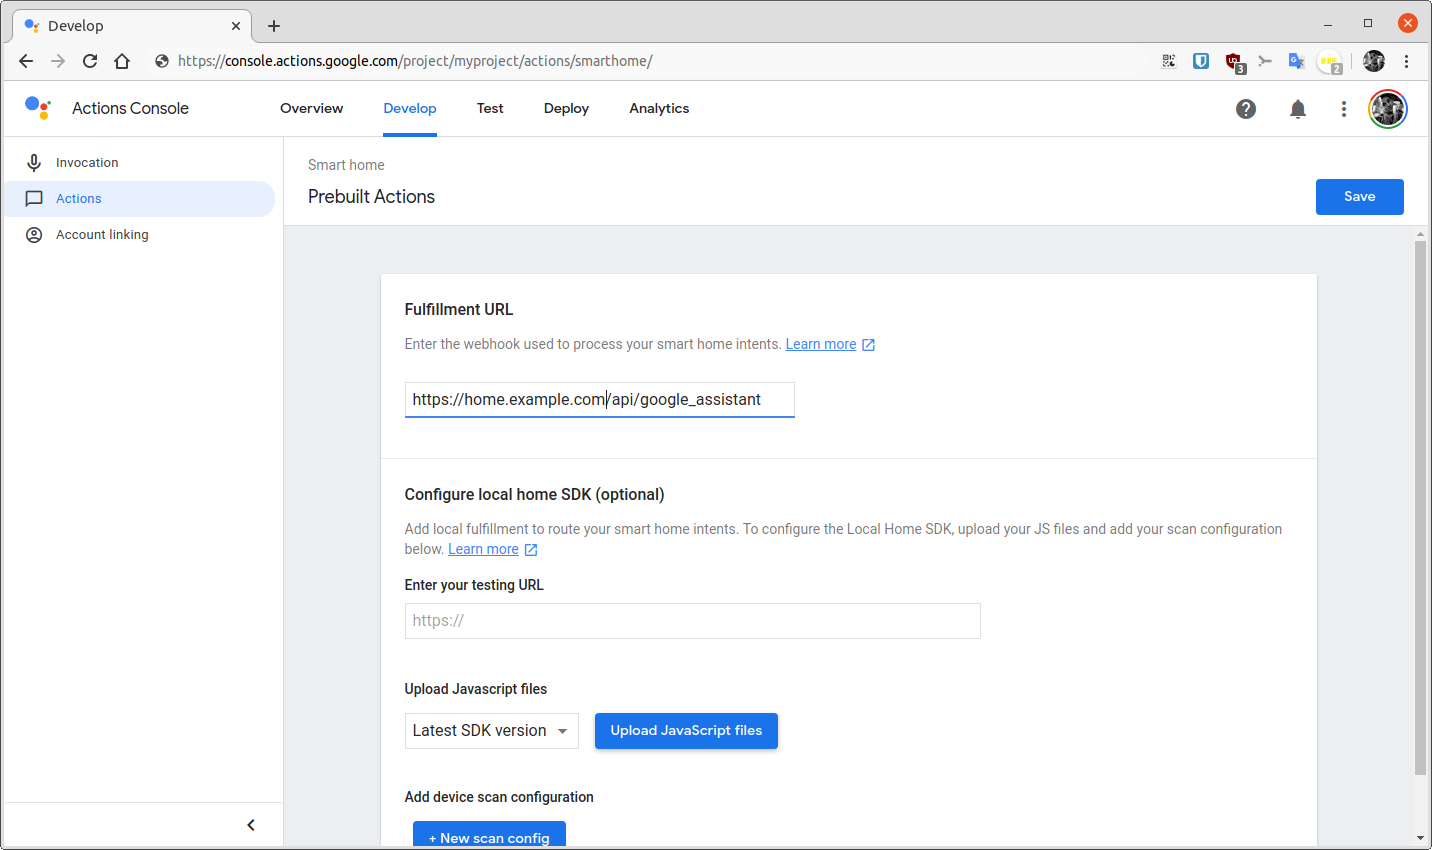
The action configuration is very simple
Again, make sure to change example.com to your domain.
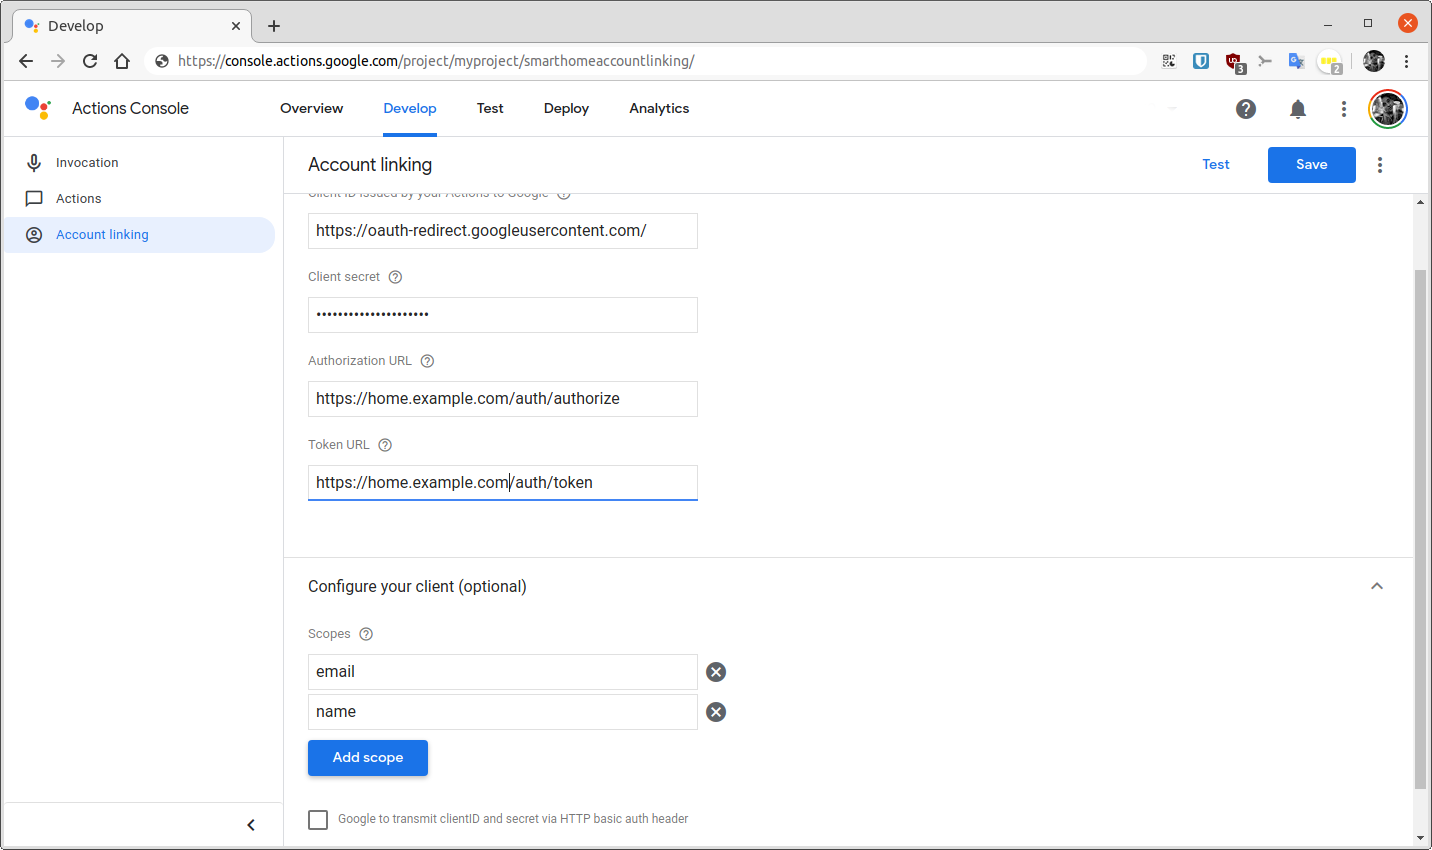
The account linking configuration is more involved.
Setting up the configuration
Copy your service account’s .json file to /etc/homeassistant/homeassistant-at-<project>.json.
# Google Assistant integration
# Actions: https://console.actions.google.com/project/<myproject>/accountlinking/
# Service account: https://console.cloud.google.com/iam-admin/serviceaccounts/details/<mylink>
google_assistant:
  project_id: <myproject>
  service_account: !include homeassistant-at-<myproject>.json
  report_state: true
  exposed_domains:
#    - light
#    - switch
  entity_config:
    light.dummy_light:
      expose: true
      name: "My Light"
The exposed_domains bit should be changed later on according to your linking. The dummy light will be visible as My Light in Google Home and in other commands.
Try it out
Open the [Google] Home app. Click the + and select Set up device. Select the first one from “Works with Google”.
Your integration should be prefixed with [test]. Once selected, it should flow through the whole setup without any further prompts, as Home Assistant is now configured to trust the proxy authentication.
After that your Home Assistant devices should be visible in the Home app’s main screen. Normal voice action on GA-enabled home speakers, should work on them.
Making the Action work for other users
Since this is a test-action, you’re the only one with access to it. To enable other to use it, see this documentation on sharing test actions.